marți, 23 iulie 2013

Artitec Oil Cart

Got a new order last month from LokShop that also contained an Artitec oil cart. Looks like Artitec is suggesting 2 color schemes - one with a bright orange for the barrel, the other, more natural, sporting a grey mettalic finish - as seen here. I opted for the latter. First photo is the small original package. Same as with the Artitec lantern building, the burrs need to be removed, this time using a combination of file and cutter. The second one shows the elements to be painted black - the chassy, supporting brackets, the wheel axle and the already masked (with 3M Vinyl Tape 471+) barrel. Last photo shows the progress over the parts to be painted in a wooden color - Tamiya Desert Yellow (XF-59) was used in 3 layers. Next up will be the piece that resembles a set of small oil canisters, located in the back of the cart itself, and finally the metallic parts - the barrel and the metal band on the wheels. Finally drybrushing along with some weathering will be used to finish it.


sâmbătă, 8 iunie 2013

Switch Issues

Soon after fixing the problem described here, I was worried that the same issue happened to one of the switches in the PT pair (M31), which experienced the same symptoms of poor electrical connectivity when part of the locomotive wheels were in the frog. Turns out it was only the Tillig 86112's brown wire that came loose from its connection with one of the wires providing power. When this happens, the voltage measured between any point of the frog and its opposing rail will be at about 6-7 Volts.
With this out of the way, I turned my attention to the switch in front of the tunnel, which started making a powerful noise for quite some time now. Opening the switch, cleaning it with the airbrush (blowing just air) and removing part of the components indicated that the motor was not at fault, and the cause of the noise was actually a broken cog - the hairline crack is visible in the first photo - not something that bad, but big enough to make the gap between those 2 teeth generate a considerable noise when being driven by the motor's worm drive. The whole component is present in figure 2. Luckily some time ago I've ordered a spare 86112, so the fastest way to fix the problem was simply switching the whole rod that contained the broken cog. Comparing the 2 switches (photo 3) showed no visible difference in this, but contrary to my memory, it's not just the color that was different among the first switch drives I bought and the subsequent ones - actually the motor itself is changed, and comparing the sounds one can immediately notice that the new ones are far more quieter. After everything was reassembled on the old drive and small amounts of silicone grease applied, I've placed the old rod and the components of the new drive (that interact with the rod) in one of those dynamic-compartment types of small plastic boxes, one of which I bought today.


duminică, 2 iunie 2013

Electrical Observations

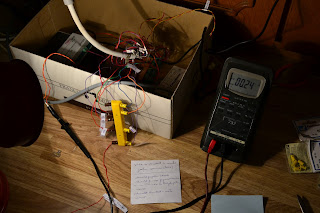
Got curious today about how much current is being drawn by the whole layout, so I've made a quick measurement and noticed a rather high consumption: about 400 mAmps with one light signal, the Viessmann pickax figurine and the Brawa V100 idling.
I went ahead and opened the box seen in the photo to try and see what wire goes where. Since 2 sets of wires were connected using the thing which can be seen next to the measurement device's black connector, I decided to switch to using the Viessmann devices specifically built for this (the yellow one in the center with its adjoining connectors). This way the wires could be disentangled and tags were placed on each fire or pair of wires, depending on the case. Now with the ability to disconnect/connect everything one by one, the results became clear:
- LZV100 draws 160 mAps, with or without the output to the lines connected (rather important, since in the beginning I though there maybe were losses on the rails themselves, even though feeder wires are soldered to each rail segment) - in the photo this is the black box in the lower left corner of the cardboard box
- the LK200 inverter didn't consume anything (no locomotive was ran on its segment though) - in the photo it's the small white device on top of the LZV100
- Viessmann 5223, the module that commands the 4013 Viessmann light-signal, consumes 80 mAmps
- the 4013 light signal consumes 20 mAmps (this includes its entries connected in cascade to the Phidget for obtaining the multiple aspects this signal is capable of)
- the pickax Viessmann figurine draws 30 mAmps
- Brawa V100 consumes 40 mAmps while in standby, 20 mAmps for the lights and 150 mAmps for the sound (when the sound effects aren't that noisy the value seems to go down)

Fixing Electrical Connectivity on the Long LR Switch

There have been some electrical problems for some time now, with the Brawa V100 going through this long switch, whose installation was covered here. When the locomotive would be going slow, in the position marked by the two red pins, it will lose power. Using an electrical measuring tool soon showed that the frog rails weren't receiving any power (the frog rails are the fixed rails that go "out" of the frog).
Fixing it would have been possible using Tillig's 85506 contact clips, but as with the rail joiners, electrical conductivity isn't that reliable. Only thing that would make sure the original issue goes away was soldering a wire to the frog rails.
Un-mounting the switch however wasn't that easy, since the rail joiners only slided completely at the upper end (by pushing the ties a bit; even if secured to the foam, the latter allowed just enough movement). For the other 2 ends -since 2 isolating Tillig joiners are used for the 2 frog rails, the rails had to be physically lifted to allow removal. Alcohol was used, using a pipette so that the drops could reach between the ties. After a few applications and a couple more minutes, the ties came loose and the switch lifted from its support.
In the second photo the cause of the problems can be seen: the metal piece joining both the frog rails (now soldered to the red wire) and rails inside the frog itself (now soldered to the brown wire; also it's clearly visible where these end, before the point blades themselves start) was secured in a faulty manner when this switch was build - resulting in poor connectivity. Cleaning of the metal spots and the soldering itself was done as mentioned in the article at the beginning. Even though the original problem consisted of the frog rails lacking electrical connectivity, I went ahead and soldered a wire to the frog itself, so this all this removal operation won't be needed in the future. Even if first decided to remove the violet wire soldered to the metal piece, I re-soldered it thinking that there's no harm in an extra point of contact.
All 3 wires were connected to the Tillig's 86112 white wire. The third photo shows how the switch looks like installed in its place. Some ballast must be glued so that the remaining holes can be hidden, and also some weathering powders to make the soldered wires invisible

The way the wires are connected together under the board is presented below for future reference:
I - blue, green, green, violet (the latter is the wire secured to blade associated with the inner route)
II - brown, yellow, yellow, blue(the latter is the wire secured to the blade associated with the outer route)

The rod connecting to sliding tie to the Tillig motor was cut to size also. One important warning is to secure the screw holding the rod, otherwise symptoms like the ones mentioned here can appear.


A very good guide for assembling the Tillig switch kits can be found here.

duminică, 12 mai 2013

Lantern Building Assembled

I finally got everything assembled. Some UHU super-glue was used the most, with some Bison special formula to get the roof attached. 

For the lamp, Tamiya Cockpit Green (XF71) was used as Artitec's LGN specification, while the door was airbrushed with Tamiya Red Brown (XF64), followed by a drybrush with concrete. Both items had Tamiya Flat White (XF2) applied where needed. For the 2 pipes belonging to the roof, the same gray used at the end of this previous article was selected.


Proxxon Thermocut

About 2 months ago, while trying to cut some thin layer of foam to be placed under the Brawa platform support, I realized that the same old ways I used to cut foam are making me lose hours, with the results never being exact. So I went online and ordered from a local online dealer the Proxxon Thermocut 230/E.

Priced at 130 euros, this machinery could have easily saved me days (!) of work back when I was building the ramps and various pillars. With a very thin wire that's kept straight by the arm, you can do cuts in various angles, both horizontally and vertically  (the piece holding the wire on the upper side of the arm can slide). The guiding system is really good and sturdy (maybe it has something to do with the fact that the machine is built in Germany). To be on the safe side, I ordered a spare wire coil (like the one seen here on the top of the arm) which holds 30 m of wire. The heating temperature can be easily modified and the base is actually printed with cm markings and a protractor - all in all one of the best investments recently made.

Lantern Building Roof

With my eye both on the finished building, as it appears on the Artitec site, and on the list of colours supplied by the same manufacturer, I first tried using something different for the roof than the colour recommendation dictated. Since Artitec used a copper-ish finish, and since I already had 2 small bottles of Tamiya XF-6 (Copper) I first used the formula below:

64 drops of XF-2 (Tamiya Flat White)
20 drops of XF-6 (Tamiya Copper)
87 drops of X-20A (Tamiya Thinner)


The result above wasn't really what I was after - the glossy effect actually ruined everything. Hence I turned to the suggested Artitec colours, bought the Tamiya XF-56 (Mettalic Grey) which is the corresponding color from Tamiya for the suggested Artitec list (they only give Revell and Humbrol colour codes) and used it, while trying to leave a hint of the previous coats. Below the result, after the roof was secured to the rest of the building.


Formula used the last time:


20 drops of XF-2 (Tamiya Flat White)
20 drops of XF-56 (Tamiya Metallic Gray)
40 drops of X-20A (Tamiya Thinner)

[later edit] This is the color ZK on the Artitec instructions